直接使用模块
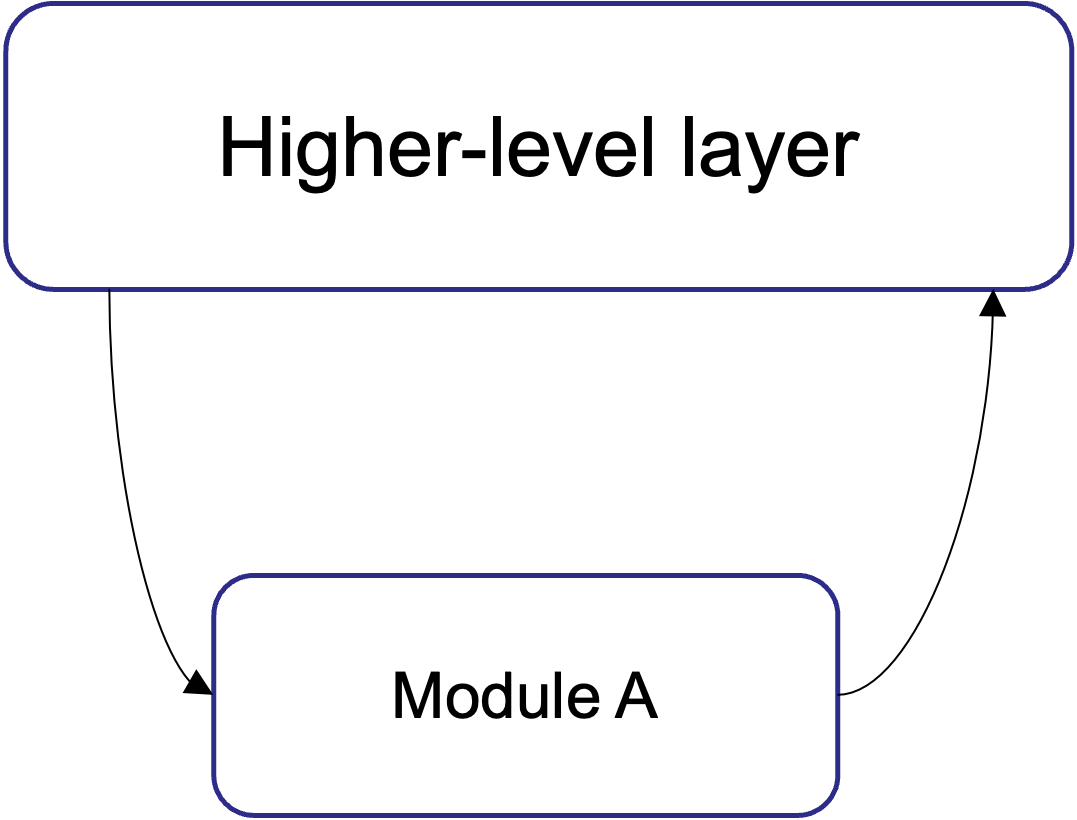
一些用户可能并不需要使用 BMF 框架的复杂的 Graph 组合和连接,而是想单独使用某个模块的能力。同步模式为用户提供了以原子形式直接调用模块能力的函数。用户可以直接调用这些模块的函数而无需构建 Graph,如下图所示:
我们主要介绍了Python 同步模式的实现。C++ 和 Go也有相应的实现机制。

此 Markdown 文件列出了您在自己的计算机上运行代码的步骤。快速体验:
编写并实现一个同步模式调用代码
这段代码首先调用 bmf_sync.sync_module 接口创建四个 BMF 模块(c_ffmpeg_decoder、c_ffmpeg_filter(Scale)、c_ffmpeg_filter(volume)、c_ffmpeg_encoder)。然后,它不断地从输入视频中读取视频流,逐帧解码。解码后,首先将其发送到 Scale Filter Module,将视频缩放到 320 x 250 的分辨率。然后将获取的处理后的视频帧,发送至 volume Filter Module 进行一次音量调节。最后,将视频发送到 Encoder Module 进行视频编码并保存为文件。我们通过两个子步骤完成同步模式的演示实现。
创建同步模块
在这段代码中,我们首先调用了 bmf.sync_module 接口来创建三个模块。该接口的定义如下:
def bmf.builder.bmf_sync.sync_module (
   name,
   option,
   input_streams,
   output_streams
)

Create SyncModule by name, option, input_stream_id_list and output_stream_id_list.

Parameters

name the name for the module
option the option for the module
input_streams the input stream id list for the module
output_streams the output stream id list for the module

Returns
bmf_sync.SyncModule
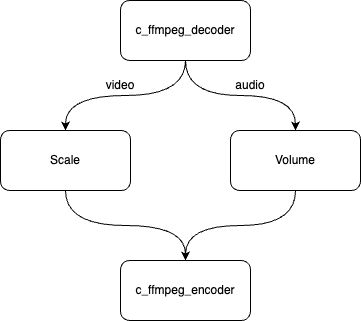
使用上述接口,我们创建了一个 Decoder module,两个 Filter module 以及一个 Encoder module。对于 Decoder module,我们设置了两个输出流(编码为数字 0 和数字 1),数字 0 对应视频流,数字 1 对应音频流。对于 Scale 和 Volume 这两个 Filter module,我们分别设置了 1 个输入流和 1 个输出流,统一编码为 0。
import bmf
from bmf import bmf_sync, Packet
input_video_path = "./big_bunny_10s_30fps.mp4"
output_path = "./video.mp4"

# create sync modules
decoder = bmf_sync.sync_module("c_ffmpeg_decoder", {"input_path": input_video_path}, [], [0, 1])
scale = bmf_sync.sync_module("c_ffmpeg_filter", {
    "name": "scale",
    "para": "320, 250"
}, [0], [0])
volume = bmf_sync.sync_module("c_ffmpeg_filter", {
    "name": "volume",
    "para": "volume=3"
}, [0], [0])
encoder = bmf_sync.sync_module("c_ffmpeg_encoder", {
    "output_path": output_path
}, [0, 1], [])
编写并实现 pipeline 代码
在上述 process 中,我们构建了所需的 4 个同步模块。下图展示了一个 pipeline 和一个视频处理 process:

构建这个 pipeline 时,我们主要调用了 bmf_sync.process 接口,其定义如下:
def bmf.builder.bmf_sync.process (
  module,
  pkts_dict
)

Directly do module processing.

Parameters

module corresponding syncModule object
pkts_dict a dict which contains all input data packet

Returns
result_dict, task.timestamp
使用这个接口,我们将上面创建的模块组合起来,并使用一个 dictionary 将输入 pkt 一一映射到同步模块的输入流和输出流中,然后实现了整个视频处理 pipeline。
# process video/audio by sync mode
while True:
    frames, _ = bmf_sync.process(decoder, None)
    has_next = False
    for key in frames:
        if len(frames[key]) > 0:
            has_next = True
            break
    if not has_next:
        bmf_sync.send_eof(encoder)
        break
    if 0 in frames.keys() and len(frames[0]) > 0:
        frames, _ = bmf_sync.process(scale, {0: frames[0]})
        bmf_sync.process(encoder, {0: frames[0]})
    if 1 in frames.keys() and len(frames[1]) > 0:
        frames, _ = bmf_sync.process(volume, {0: frames[1]})
        bmf_sync.process(encoder, {1: frames[0]})